Contact Search and Merge
Parks & Rec > Contact > Search
The Contact Search page has been redesigned to give you a more intuitive, versatile searching and filtering experience, along with contact merging functionality:
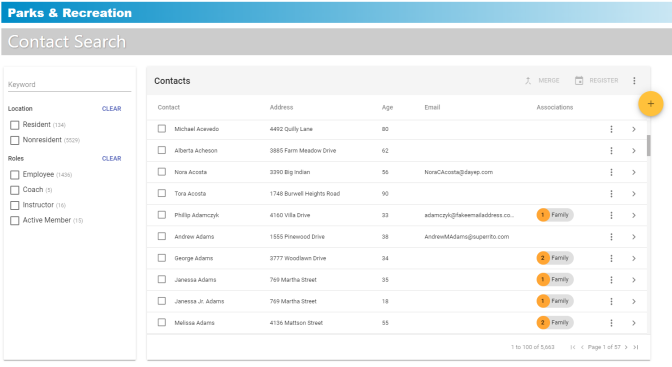
The page contains a left panel for searching and filtering and a right panel for viewing and managing the search results. When you first open the page, the right panel contains all contacts in the system, displaying a maximum of 100 per page.
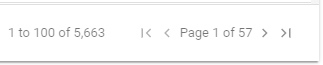
The bottom-right of the page shows the range of 100 in view (1 to 100, 101 to 200, etc.), the total number of contacts, the page number, total pages and chevrons for moving forward and backward one page at a time or moving directly to the first or last page:
You may narrow the results and find what you need quickly using the search and filter panel.
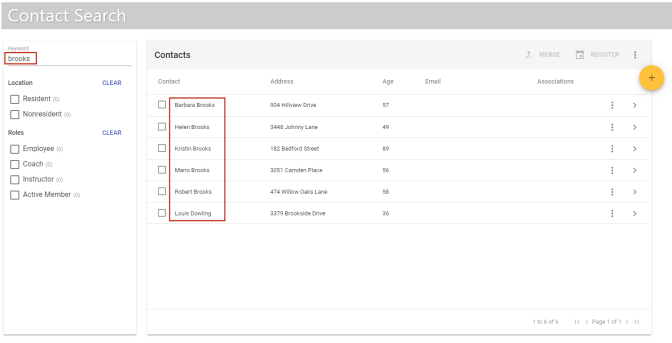
In the search and filter panel, use the Keyword field to find contacts by name, address, age, email or associations. As you type in the field, the results panel continually refreshes to contain only the contacts whose data matches what you type, presented in alphabetical order by contact name:
Below the Keyword field are check boxes for contact Location (Resident or Nonresident) and Roles (Employee, Coach, Instructor, Active Member), with the number of potentially matching records shown in parentheses next to each item:
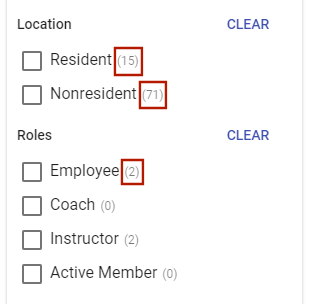
To filter the results, select the check boxes next to the appropriate items. The right panel refreshes with the results for those selections only. Selecting a check box reduces the results to the number of pages shown in parentheses and affects the numbers next to the other items; for example, in the image above, selecting Resident would eliminate the Nonresident contacts from the grid and might reduce the number of potentially matching contacts who are employees or instructors:
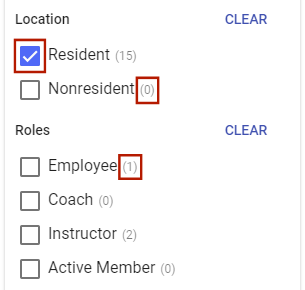
Note: Active Member results are based on contacts who have active memberships.
To clear Location or Roles selections, click the corresponding CLEAR button.
The search results panel contains the contact records with data matching the Keyword and check box selections in the search and filter panel. If the Keyword is blank and all check boxes are cleared, the grid contains all contact records in the system, sorted alphabetically by contact name.
Contact Merge
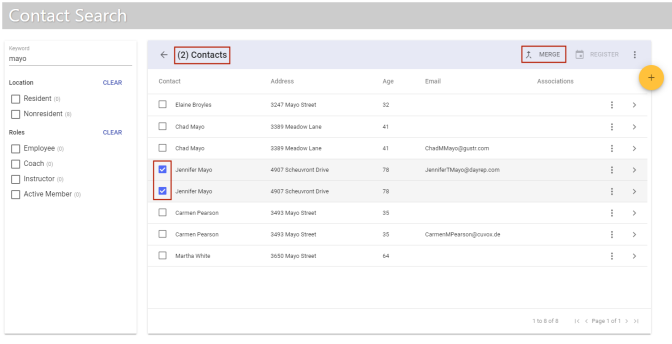
Located in the top-right corner of the search results panel, the MERGE button lets you merge two contact records into one. It is enabled only when two contacts have been selected in the results panel:
Note: This button is available only to users who have Create, Update and Delete rights selected for the Search component on the Rights tab of the User Role Details page in System Setup (Administration > System Setup > User Role > Edit > Rights).
If the results panel contains only one of the contact records you want to merge, select the record, and use the search panel to find the second one. The first record remains selected and moves to the top of the grid.
Once you have selected the records to merge, click the MERGE button. A dialog opens with the two records shown side-by-side:
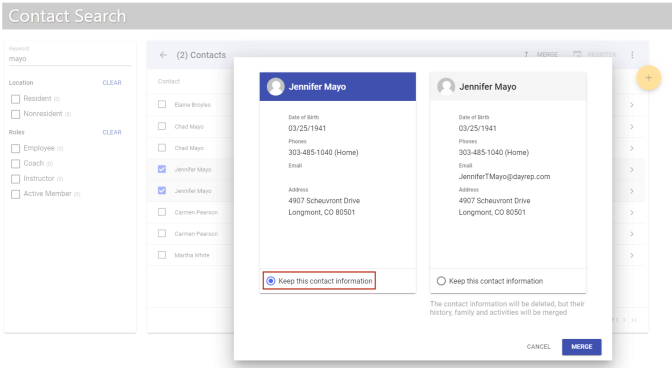
By default, the first record selected is shown on the left with its header highlighted in blue and the Keep this contact information radio button selected. If you continue with the merge, the contact information on the right is deleted, but all history, including registrations, transactions, family members, contacts and activities, associated with that record is transferred to the record on the left.
If you want, you may switch the direction of the merge by selecting the Keep this contact information radio button on the record on the right.
If the record being deleted contains contact information, such as Phone or Email, that is not on the record being retained, it moves to the record being retained.
When you are ready to merge the records, click the MERGE button. A dialog asks you to confirm you want to proceed with the merge, noting the action cannot be undone:
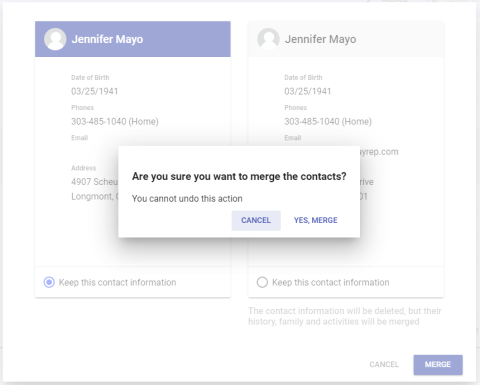
If you want to proceed, click the YES, MERGE button.
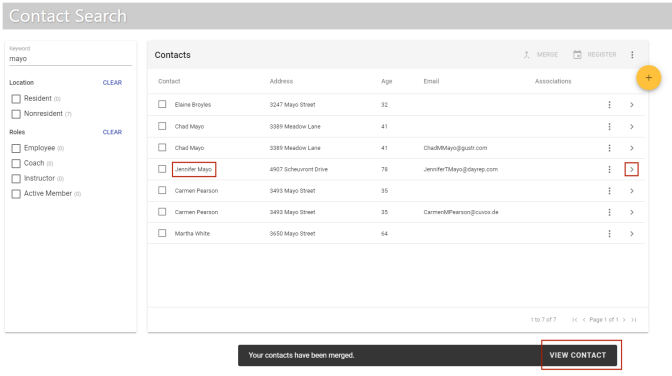
When the merge completes, the Contact Search results panel refreshes, giving you the option to view the Contact Detail record by clicking the VIEW CONTACT button that appears briefly below the panel or the chevron ![]() that appears on the far-right side of the merged contact’s row:
that appears on the far-right side of the merged contact’s row:
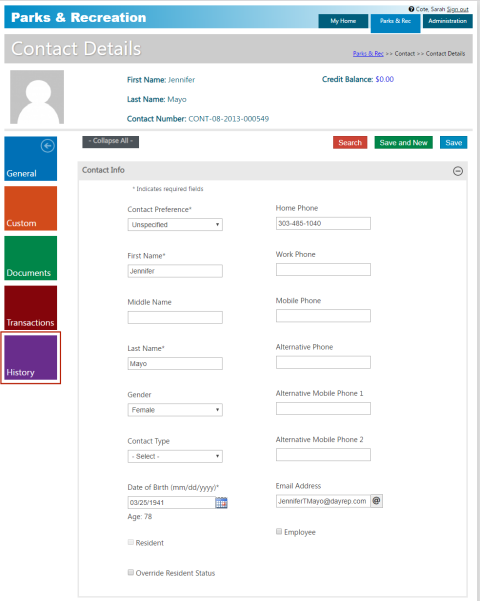
To view a comparison of the merged changes, click the History button on the left side of the Contact Details page.
Contact Register
Located to the right of the MERGE button, the REGISTER button lets you register a contact for a class. It is enabled when the contact has been selected in the results panel. Clicking the REGISTER button opens the Class Registration Create page, with the selected contact assigned as the Payer:
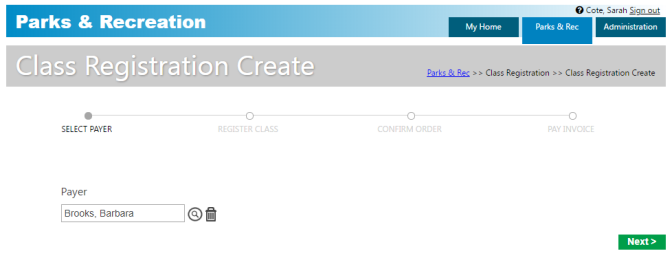
If necessary, you may select a different payer before continuing with the registration process.
Note: The REGISTER button works for one contact at a time. Selecting more than one contact in the results panel disables the button.
Export and Update
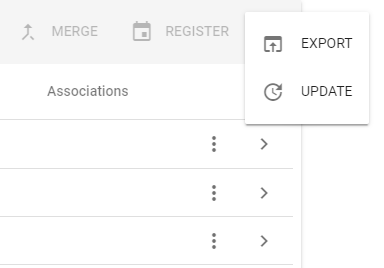
Located to the right of the REGISTER button, the vertical ellipsis opens a menu that gives you options to EXPORT and UPDATE contact search results data:

These options function as they did in prior versions of the software; note, however, that regardless of whether you select a subset of contacts, updating and exporting affect all contacts displayed in the search results panel.
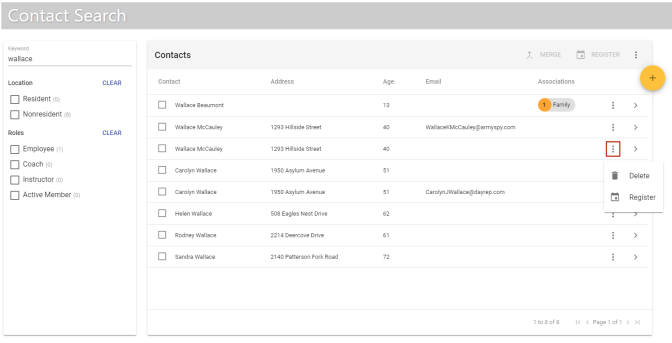
Delete and Register
The vertical ellipsis on the right side of each contact row opens a menu that gives you options to Delete the contact and Register the contact for a class:
Add Contact
If you want to add a contact, click the orange plus button  on the top-right side of the results panel. The Create Contact dialog opens:
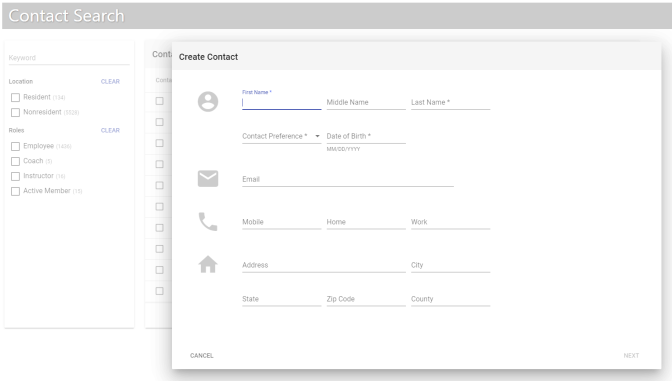
First Name, Last Name, Contact Preference and Date of Birth are required. The Contact Preference selection drives the remaining entries required.
After completing the information in this dialog, click NEXT. If the first and last name and one other item on the dialog match another contact already in the system, a duplicate prevention dialog opens, showing the new contact on the left and the original one on the right. If an entry on the new contact duplicates one on the original, a Same as new contact tag appears to the right of the duplicate entry on the original:
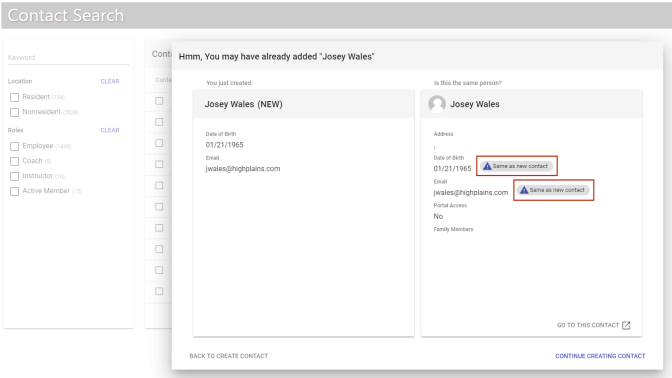
From the duplicate prevention dialog, you have the options to navigate to the Contact Details page of the original contact, return to the Create Contact dialog or continue the process of creating the new contact:
- GO TO THIS CONTACT: This link discards the new contact and takes you to the Contact Details page of the original contact. A confirmation dialog asks you to confirm whether you want to proceed to the original contact.
- BACK TO CREATE CONTACT: This link returns you to the Create Contact dialog, with your current entries still in place.
- CONTINUE CREATING CONTACT: This link takes you to the main Contact Details page to complete the contact create process.